What is CloudStack Canvas?
CloudStack Canvas (CSC) is a browser-based visual designer for AWS infrastructure. You drag services onto an infinite canvas, connect them, configure properties, and export production-ready Infrastructure as Code — no YAML hand-authoring required.
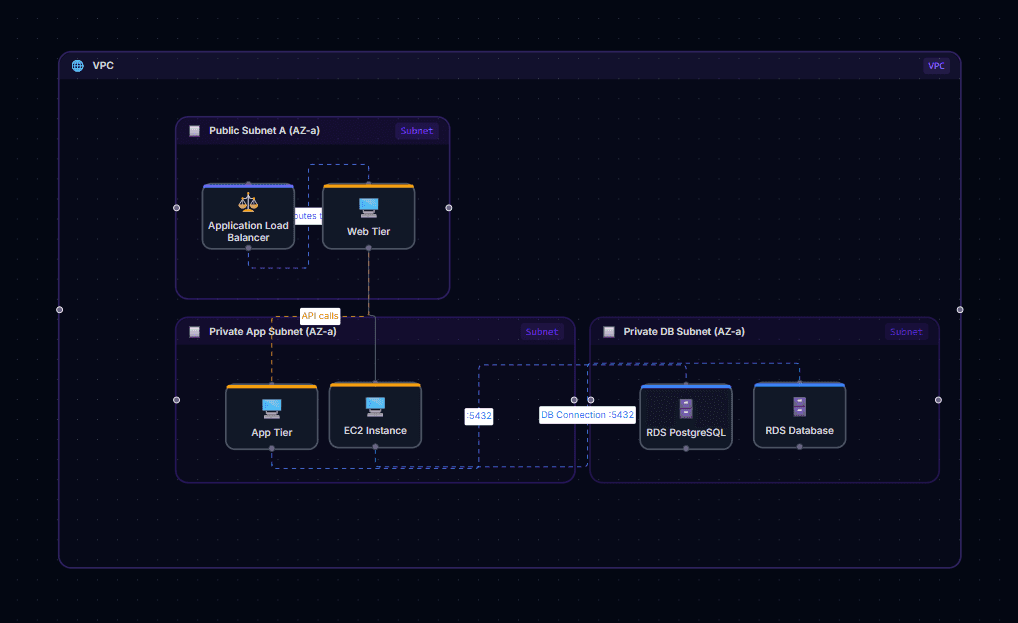
The canvas understands AWS architecture rules: it automatically places resources inside the correct containers (EC2 instances go inside Subnets, Subnets inside VPCs), generates the dependent resources you need (IAM roles, Security Groups), and validates placement before letting you drop.
Quick Start
- 1
Create a project
From the Dashboard, click "+ New Project". Choose Simple mode to get auto-wiring or Advanced mode for full control.
- 2
Add resources from the palette
The left panel lists all available AWS services grouped by category. Drag any service onto the canvas to place it.
- 3
Connect resources
Hover over a node until you see the connection handle (a small circle on the edge). Click and drag to another node to draw an edge.
- 4
Configure properties
Click any node to open the Properties panel on the right. Change the label, instance type, storage size, or any resource-specific setting.
- 5
Export your infrastructure
Click "Export IaC" in the toolbar. Choose CloudFormation JSON or CloudFormation YAML. The file downloads immediately.
Resource Palette
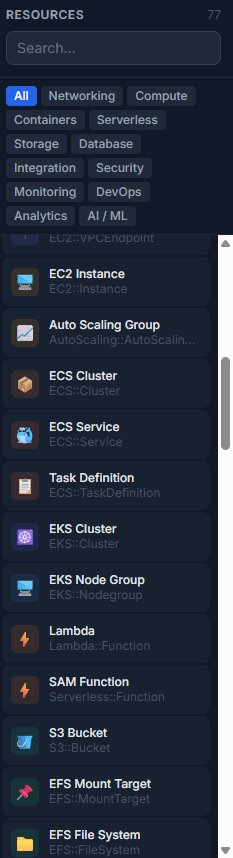
The left sidebar lists every supported AWS service, organized into categories: Compute, Storage, Database, Networking, Security, Messaging, and more. Use the search box at the top to filter by name or keyword.
Dropping a resource
Drag any service icon from the palette and drop it onto the canvas. CSC checks placement rules before adding the node:
- Resources that require a VPC (EC2, RDS, ECS, etc.) are automatically placed inside one. If no VPC exists yet, CSC creates one for you.
- Resources that require a Subnet are placed inside a Subnet inside the VPC.
- If a required container doesn't exist, CSC creates the full hierarchy automatically.
Auto-generated dependencies
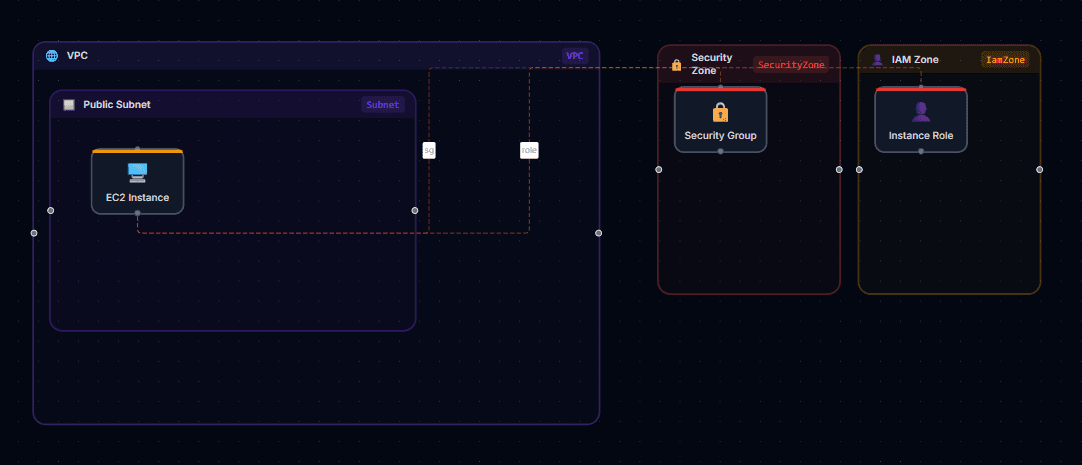
Many services create companion resources automatically. For example, dropping an EC2 instance also generates:
- An EC2 Security Group (inside the Security Zone)
- An IAM Instance Role (inside the IAM Zone)
These auto-generated nodes are linked visually and included in all IaC exports. You can hide them with the layer toggles if they clutter the view.
Simple vs Advanced Mode
Every project runs in one of two modes. You choose when creating the project. You can switch a project's mode at any time using the toolbar button in the editor. You can also set a default mode for new canvases in Settings → Canvas Defaults.
- ✓ Auto-naming (env + project prefix)
- ✓ Auto-generated Security Groups and IAM roles
- ✓ Auto-wired dependencies on drop
- ✓ Cleaner canvas with auto-managed resources
- ✓ Best for prototyping and learning
- ✓ Full control over all resource names
- ✓ Manually place any resource anywhere
- ✓ All infrastructure nodes visible
- ✓ Fine-grained property editing
- ✓ Best for production and team use
VPCs, Subnets & Zones
CSC uses container nodes to represent AWS grouping constructs. Child resources live visually inside their parent containers, and this hierarchy is reflected in the IaC output.
| Container | What goes inside |
|---|---|
| VPC | Subnets, Security Zones, IAM Zones, and VPC-level resources |
| Subnet | EC2 instances, RDS, ECS tasks, Lambda (VPC-mode), etc. |
| Security Zone | EC2 Security Groups, Network ACLs — organizational only |
| IAM Zone | IAM Roles and Policies — organizational only |
Resizing containers
Hover over the edge or corner of any container (VPC, Subnet, etc.) to reveal the resize handle. Drag to expand or contract. The canvas enforces a minimum size so children are never clipped. Resizing is undoable with Ctrl+Z.
Security Zone and IAM Zone
These two zone types are CSC-only organizational containers. They do not map to an AWS resource and are excluded from IaC exports. They exist solely to keep Security Groups and IAM Roles visually separated from your main architecture.
Connecting Resources
Edges represent relationships between resources (data flow, network access, IAM trust, etc.). In the exported IaC they become references or dependency declarations between resources.
- 1
Hover over a node
A small circle (connection handle) appears on the edges of the node.
- 2
Click and drag the handle
Pull to another node. A preview edge follows your cursor.
- 3
Release on the target node
CSC resolves the relationship type automatically based on both resource types. For example, EC2 → S3 generates "S3 Access" — scoped IAM actions on the instance role plus an S3 Gateway VPC endpoint. When a connection is ambiguous (e.g. CloudFront → S3 could mean "S3 Origin" or "Access Logs"), a dialog appears asking you to choose.
Deleting an edge
Click an edge to select it (it turns highlighted), then press Delete or Backspace.
Resource Properties
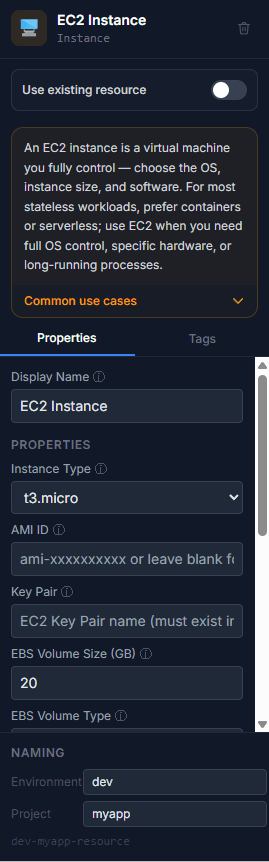
Click any node to open the Properties panel on the right side of the canvas. The panel shows fields specific to that resource type.
Common fields
- Label — the display name shown on the canvas node. Editable inline by double-clicking the node label.
- Resource-specific fields — instance type, engine version, storage class, memory size, etc.
Naming configuration
In Simple mode, all resource names follow the pattern {prefix}-{project}-{environment}-{resource}. Change the environment, project name, and prefix in the canvas toolbar's naming settings.
Templates
Templates give you a pre-wired starting point for common architectures. Access them via the Templates button in the canvas toolbar.
| Template | Tier | What it includes |
|---|---|---|
| Static Website | free | S3 + CloudFront with OAC, HTTPS-only, SPA routing |
| Starter VPC | free | VPC with public/private subnets, IGW, NAT, route tables |
| Single EC2 Server | free | EC2 in a VPC with security group + IAM instance role |
| Serverless API | pro | API Gateway REST API (full proxy) + Lambda + DynamoDB |
| Web App (EC2 + RDS) | pro | EC2 + ALB + RDS inside a VPC with public/private subnets |
| 3-Tier Architecture | pro | ALB + web-tier EC2 + app-tier EC2 + RDS, each layer segmented |
| ECS Fargate Microservice | pro | ALB + ECS Fargate service with execution/task roles + RDS |
| Serverless Full-Stack | pro | CloudFront + S3 frontend, HTTP API + Lambda + DynamoDB + Cognito |
| Event-Driven Pipeline | pro | SNS fan-out + SQS + Lambda trigger + DynamoDB, with a DLQ |
| Data Analytics Pipeline | team | S3 data lake + Glue ETL + Athena + Redshift |
| High Availability Web App | team | Multi-AZ ECS Fargate + Aurora Serverless v2 + Redis + WAF-protected ALB |
| Billing Alarm | pro | CloudWatch billing alarms ($10/$50/$100/daily) + SNS email |
Undo & Redo
CSC maintains a 50-step history for every canvas change: adding/removing resources, connecting nodes, moving nodes, resizing containers, editing labels, and changing properties.
| Action | Shortcut |
|---|---|
Ctrl+Z | Undo last action |
Ctrl+Y | Redo |
Ctrl+Shift+Z | Redo (alternative) |
Each logical action is one undo step. Dragging a node across the canvas is one step, not one step per pixel. Dropping a resource that auto-creates dependencies (VPC + Subnet + SG + IAM role) is also a single undo step.
Layer Visibility
The toolbar contains five layer toggles that let you hide categories of nodes without removing them from the canvas. Hidden nodes are still included in all IaC exports.
| Layer | What it hides |
|---|---|
| IAM Layer | IAM Roles, IAM Policies, and IAM Zone containers |
| Security Group Layer | EC2 Security Groups, Network ACLs, and Security Zone containers |
| Networking Layer | VPC and Subnet containers (child nodes remain visible, floating) |
| Wiring Layer | Connection edges between nodes |
| Annotation Layer | Text labels and labeled group/boundary boxes |
Adding annotations
Use the toolbar buttons to add text labels and labeled group or boundary boxes to your diagram. These annotations help document your architecture but are not included in the IaC export.
Keyboard Shortcuts
All shortcuts work when focus is on the canvas (not inside a text input).
| Shortcut | Action |
|---|---|
Ctrl+K | Quick-add: search and place any service at viewport center |
Ctrl+C | Copy selected nodes |
Ctrl+V | Paste from clipboard |
Ctrl+D | Duplicate selected nodes |
Ctrl+P | Print or save diagram as PDF |
Ctrl+Z | Undo |
Ctrl+Y | Redo |
Ctrl+Shift+Z | Redo (alternative) |
Delete | Delete selected nodes or edges |
Backspace | Delete selected nodes or edges |
Ctrl+Click | Add to selection (Cmd+Click on Mac) |
Arrow keys | Nudge selected nodes (1px per key, 16px with Shift) |
? | Open keyboard shortcuts overlay |
Escape | Deselect all |
Scroll | Zoom in / out |
Space+Drag | Pan the canvas |
Minimap & Controls
The bottom-right corner of the canvas shows the minimap — a scaled overview of all nodes. Click anywhere on the minimap to jump the viewport to that location. Colored squares on the minimap match the primary color of each resource node.
Hiding the minimap
The minimap visibility is controlled by your user settings. Go to Settings → Canvas Defaults and toggle the minimap option.
Controls panel
The Controls panel (bottom-left) provides three buttons that are always visible:
- Zoom In — increase zoom level
- Zoom Out — decrease zoom level
- Fit View — zoom and pan to show all nodes
Security Findings
The findings panel surfaces deploy-readiness and security risks as you design — public buckets, overly permissive IAM policies, world-open security groups. Findings are live, appearing on the canvas as you add and connect resources.
Accessing the panel
A floating Findings pill appears at the bottom-right of the canvas. Click it to expand the findings panel showing all current deploy-readiness and security issues, organized by severity. The pill shows the count of all findings.
What is checked
- S3 public access — S3 buckets with public read or write permissions
- Wildcard IAM policies — IAM roles or policies with
*actions or resources - Open security groups — security groups allowing inbound from 0.0.0.0/0 on sensitive ports
- Missing encryption — databases or storage without encryption enabled
- Publicly accessible databases — databases with PubliclyAccessible enabled
Plan access
The findings panel is mounted on all plans. Free plan users see the finding count and an upgrade CTA to view details.Pro and Team users see the full finding details, remediation guidance, and can click findings to jump to the offending resource on the canvas.
Taking action
Click any finding to jump to the offending resource on the canvas and open its property panel (Pro/Team only). Fix the issue (tighten IAM, restrict the security group, enable encryption, disable public access) and the finding disappears from the panel in real time.
CloudFormation
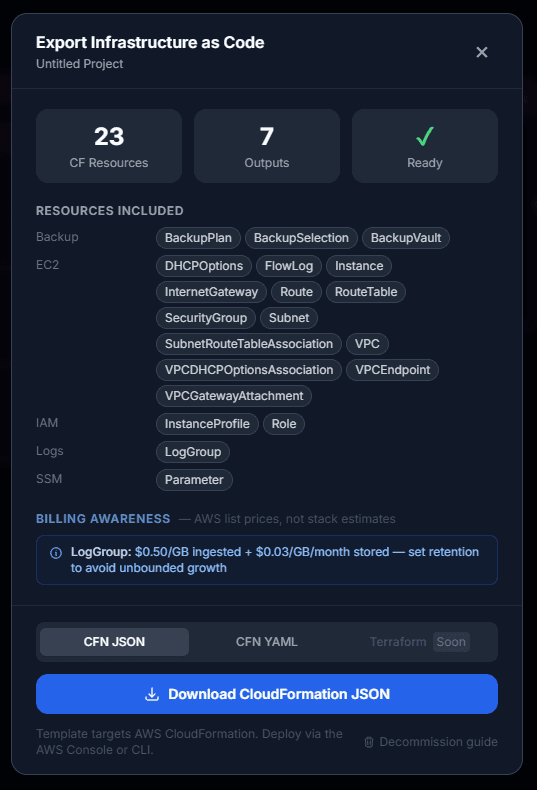
CloudFormation export is available on all plans. CSC generates a complete, deployable CloudFormation template from your canvas.
- 1
Click "Export IaC" in the toolbar
The export dialog opens showing available formats for your plan.
- 2
Choose JSON or YAML
Both formats are identical in content. JSON is the default; YAML is more human-readable for version control.
- 3
Download
The file downloads as {project-slug}-cloudformation.json or {project-slug}-cloudformation.yaml (e.g. my-project-cloudformation.yaml). Deploy it with the AWS Console, CLI, or CDK.
What gets exported
- All resource nodes on the canvas (including hidden layer nodes)
- All edges as DependsOn or reference properties
- Resource properties set in the Properties panel
- Naming config (prefix, environment, project)
What is excluded
- Security Zone and IAM Zone containers (CSC-only organizational nodes)
- Canvas metadata (positions, colors, labels used only for display)
Deploying with the AWS CLI
Terraform
Import onlyTerraform HCL import is available today as a partial single-file preview. Use Import Template on the New Canvas screen or the Import IaC button on the canvas toolbar to visualize resource blocks from a.tffile. Modules, data sources, variables, and connections are not imported. This is a design-time preview to help you visualize existing infrastructure; it is not a full round-trip conversion.
Terraform HCL export is not currently supported — exports are CloudFormation JSON and YAML.
Free, Pro, and Team plans export production-ready CloudFormation in JSON and YAML. Pro adds bidirectional IaC sync for keeping your codebase in sync with the canvas.
Git/PR Export
ProThe Git/PR export feature (Pro plan) lets you push CloudFormation directly to a GitHub repository branch and open a pull request — all without leaving the canvas.
Set up GitHub integration
- 1
Go to Settings → Integrations
Navigate to your Settings page and open the Integrations tab.
- 2
Click "Connect GitHub"
A GitHub authorization dialog opens. Authorize CloudStack Canvas to access your repositories.
- 3
Select a repository
Choose which repository CSC should push to (you can change this per export).
Export to a branch and PR
- 1
Click "Export IaC" on the canvas
The export modal opens, showing CloudFormation JSON and YAML options as usual.
- 2
Select "Push to GitHub"
Choose the GitHub option (visible only if you've connected GitHub in Settings). Optionally select a different repository or change the branch name.
- 3
Confirm
CSC creates a new branch, commits the CloudFormation file, and pushes it to your repository.
- 4
Open PR
You'll see a link to open a pull request on GitHub. Click it, add a description, and your code review flow begins — all your CloudFormation changes are now in version control with team review.
{project-slug}-cloudformation.yaml or{project-slug}-cloudformation.json to the branch you specify. Customize the file path in the export dialog if you prefer it in a subdirectory.About the GitHub authorization
When you authorize CloudStack Canvas to access GitHub, you're granting access through a dedicated OAuth app — separate from the “Sign in with GitHub” option. This OAuth app is scoped to exactly one feature: Git/PR export.
CloudStack Canvas requests the repo scope, which allows read and write access to all your repositories (including private ones). We use this scope only to: create a branch named cloudstack-canvas/{project}, commit ONE file named cloudstackcanvas/{project}.template.json, and open or reuse a pull request. We never list repos, read code, set up webhooks, or delete anything.
Your GitHub token is encrypted with AES-256-GCM and stored server-side, one row per user. When you disconnect (Settings → Integrations → Disconnect), the token is permanently deleted. You can also revoke access anytime at github.com → Settings → Applications → Authorized OAuth Apps — if you revoke there, the UI will ask you to reconnect the next time you try to export.
Export Limits
Export quotas are enforced per calendar month and reset on the 1st of each month.
| Plan | Exports / month | Formats |
|---|---|---|
| Free | 25 | CloudFormation JSON & YAML |
| Pro | Unlimited | CloudFormation JSON & YAML |
| Team | Unlimited | CloudFormation JSON & YAML |
Decommissioning Deployed Resources
If you deployed a CSC-generated template as a CloudFormation stack, tearing it down is a single command. CloudFormation tracks every physical resource it created — VPC IDs, subnet IDs, ARNs — and deletes them in the correct reverse-dependency order automatically.
Via the AWS CLI
Via the AWS Console
- 1
Open CloudFormation
Go to the AWS Console → CloudFormation → Stacks. Find the stack you deployed (it uses the stack name you provided at deploy time).
- 2
Select the stack
Click the stack name to open its detail view.
- 3
Click Delete
Click the "Delete" button at the top right. Confirm the prompt. CloudFormation will delete all resources in dependency order — subnets before VPCs, instances before security groups, etc.
- 4
Monitor progress
The Events tab shows deletion progress in real time. The stack disappears from the list once all resources are removed.
DeletionPolicy: Retain attribute, are not removed on stack delete and must be cleaned up manually.Partial teardown
If you want to remove specific resources without deleting the entire stack, update the template — remove those nodes in CSC, re-export, and redeploy. CloudFormation will delete only the resources that were removed from the template.
Resource Tagging
Every resource CloudStack Canvas generates — EC2 instances, Lambda functions, S3 buckets, RDS databases, IAM roles, NAT Gateways, VPCs, and every other CloudFormation resource in your exported template — is automatically tagged with:
This tag is present on every single resource in every template — including auto-generated sub-resources like Internet Gateways, NAT Gateways, route tables, CloudWatch log groups, SQS dead-letter queues, and IAM roles. If CSC generated it, it has the tag.
Finding your deployed resources
You can use ManagedBy = CloudStackCanvas as a filter in any AWS service that supports tag-based filtering.
AWS Resource Groups
Create a tag-based Resource Group to see everything CSC has deployed in one place:
AWS Cost Explorer
Filter or group your AWS bill by ManagedBy to see exactly what CSC-deployed infrastructure costs vs resources you created manually or with other tools.
ManagedBykey as a Cost Allocation Tag in Billing settings before you need cost data.AWS CLI — find all tagged resources
AWS Config
Use AWS Config rules or conformance packs to audit CSC-deployed resources. For example, require that all resources tagged ManagedBy=CloudStackCanvas have encryption enabled or Multi-AZ turned on.
IAM — restrict who can modify CSC resources
Add a tag-based condition to IAM policies to prevent engineers from manually modifying resources that should only be changed through CloudStack Canvas:
Overriding the tag
If your organization uses a different tagging standard (for example managed-by instead of ManagedBy), you can add your own tag with the same key in the canvas Tags panel — user-set tags always override the CSC defaults. The CSC default tag will be replaced by your version.
You can also add additional identifying tags (team name, project, cost centre) per resource in the Tags panel in Advanced mode, or globally via the Naming Config section.
What is not tagged
A small number of AWS resource types do not support tags at all — notablyAWS::ApiGateway::Deployment,AWS::ApiGateway::Stage method settings, and some networking entries. These are edge cases in the AWS tagging API — the parent resources (the API Gateway itself, the VPC) are always tagged.
Installing the AWS CLI
The AWS CLI (Command Line Interface) is a program you install on your computer that lets you control AWS directly from your terminal — deploying templates, checking resource status, and more. You need it to follow the CLI paths in the per-template deployment guides. The Console path works without it.
macOS
Recommended: download the installer — no extra tools required.
# Download and open this file in your browser — it runs like any Mac app installer:
https://awscli.amazonaws.com/AWSCLIV2.pkg
If you already use Homebrew (a Mac package manager), you can also run: brew install awscli
Windows
Download the installer file (.msi = a standard Windows installer, like .exe) and double-click to run it.
https://awscli.amazonaws.com/AWSCLIV2.msi
After installing, open a new PowerShell or Command Prompt window before continuing.
Linux
curl "https://awscli.amazonaws.com/awscli-exe-linux-x86_64.zip" -o "awscliv2.zip"
unzip awscliv2.zip
sudo ./aws/install
Verify the installation worked
Open a new terminal window and run:
aws --version
# You should see something like: aws-cli/2.x.x ...
# If you see "command not found", close and reopen your terminal and try again.
Configuring AWS Credentials
The AWS CLI needs credentials to make API calls on your behalf. The recommended approach is to create a dedicated IAM user with programmatic access, then run aws configure.
Console — create access keys
- 1
Open IAM in the AWS Console
Navigate to IAM → Users → select your user (or create one — see IAM Permissions section below).
- 2
Create access key
Click Security credentials → Create access key → choose "Command Line Interface (CLI)" → Next → Create.
- 3
Download credentials
Copy the Access Key ID and Secret Access Key. You cannot retrieve the secret again after closing this dialog.
Configure the CLI
Run aws configure in your terminal. It will ask you four questions — paste or type your answers:
aws configure
# Paste your Access Key ID from the IAM dialog (starts with AKIA...):
AWS Access Key ID [None]: paste-your-access-key-id-here
# Paste your Secret Access Key (the long string shown once in IAM):
AWS Secret Access Key [None]: paste-your-secret-access-key-here
# Type your AWS region (us-east-1 works for most CSC templates):
Default region name [None]: us-east-1
# Press Enter to accept the default (json):
Default output format [None]: json
Your credentials are saved automatically in a file on your computer. You will not need to run this again unless you create new keys.
Verify credentials are working
aws sts get-caller-identity
# Expected output:
{
"UserId": "AIDA...",
"Account": "123456789012",
"Arn": "arn:aws:iam::123456789012:user/your-user"
}
Using named profiles (optional)
If you manage multiple AWS accounts, use named profiles instead of the default:
aws configure --profile mycompany
# Use the profile for any command:
aws cloudformation deploy --profile mycompany ...
aws configure stores them securely in a hidden folder on your computer (~/.aws/credentials on Mac/Linux, or C:\Users\YourName\.aws\credentials on Windows). If you accidentally expose your keys, go to IAM immediately and delete them — then create new ones.IAM Permissions for Deployment
Your IAM user needs specific permissions to deploy CloudFormation templates and the AWS resources inside them. The safest approach is to create a dedicated deployment user with a scoped policy.
Minimum permissions for CSC templates
| Permission set | Templates that require it |
|---|---|
| cloudformation:* | All templates |
| s3:*, s3:GetBucketPolicy | All templates (CFN stores state in S3) |
| iam:CreateRole, iam:AttachRolePolicy, iam:PassRole | All templates (CAPABILITY_NAMED_IAM) |
| cloudfront:*, acm:* | Static Website, Serverless Full-Stack |
| ec2:* | Starter VPC, Single EC2 Server, Web Application, 3-Tier Architecture, ECS Fargate Microservice, High Availability Web App, Data Analytics Pipeline (VPC networking) |
| elasticloadbalancing:* | Web Application, 3-Tier Architecture, ECS Fargate Microservice, High Availability Web App |
| rds:* | Web Application, 3-Tier Architecture, ECS Fargate Microservice, High Availability Web App (Aurora) |
| secretsmanager:* | Web Application, 3-Tier Architecture, ECS Fargate Microservice, High Availability Web App, Data Analytics Pipeline (auto-generated DB/cache credentials) |
| ssm:PutParameter, ssm:DeleteParameter | Single EC2 Server, Web Application, 3-Tier Architecture (CloudWatch agent config parameter) |
| glue:*, athena:*, redshift:*, kinesis:* | Data Analytics Pipeline |
| cloudwatch:PutMetricAlarm, sns:*, cloudwatch:SetAlarmState | Billing Alarm |
| lambda:*, apigateway:*, dynamodb:* | Serverless API, Serverless Full-Stack |
| sns:*, sqs:*, lambda:*, dynamodb:* | Event-Driven Pipeline |
| cognito-idp:* | Serverless Full-Stack |
| ecs:*, ecr:* | ECS Fargate Microservice, High Availability Web App (ecr:* is for pushing your own image — CFN itself creates no ECR repository) |
| elasticache:*, wafv2:* | High Availability Web App |
| backup:* | Single EC2 Server, Web Application, 3-Tier Architecture, ECS Fargate Microservice, High Availability Web App, Serverless API, Serverless Full-Stack, Event-Driven Pipeline (auto-created backup vault/plan whenever the template includes a backup-eligible resource: EC2, RDS/Aurora, DynamoDB, or ElastiCache) |
PowerUserAccess to your deployment user — it covers most services but not IAM. Add IAMFullAccess separately (required for CAPABILITY_NAMED_IAM templates). For production, scope down to the specific services your templates use.Console — steps to create a deployment IAM user
- 1
Go to IAM → Users → Create user
Enter a name like "csc-deploy". Do not enable Console access — this user only needs programmatic (CLI) access.
- 2
Attach permissions
Choose "Attach policies directly". Search for and attach PowerUserAccess + IAMFullAccess, or create a custom policy scoped to the services your templates use.
- 3
Create access keys
After creating the user, go to Security credentials → Create access key → CLI → create. Copy the keys and run aws configure.
--capabilities CAPABILITY_NAMED_IAM flag is required on all CSC template deploys. Without it, CloudFormation refuses to create IAM roles even if your user has the permission.CloudFormation Troubleshooting
When a CloudFormation deployment fails, the stack enters ROLLBACK_COMPLETE or CREATE_FAILED state and automatically undoes any resources it created. Here is how to diagnose and fix failures.
Step 1 — Find the root cause
Console: In the AWS Console, go to CloudFormation (search for it in the top bar). Click on your stack name in the list. At the top of the stack detail page, click the Events tab. The list shows newest events at the top — scroll to the bottom to find the oldest (first) failure. Red rows are failures. Read the Status reason column — that is your error message.
CLI:
aws cloudformation describe-stack-events \
--stack-name YOUR-STACK-NAME \
--query "StackEvents[?ResourceStatus=='CREATE_FAILED'].[LogicalResourceId,ResourceStatusReason]" \
--output table
Common errors and fixes
InsufficientCapabilities — requires CAPABILITY_NAMED_IAM
Add --capabilities CAPABILITY_NAMED_IAM to your deploy command. All CSC templates create IAM roles and require this flag.
Access Denied / not authorized to perform: iam:CreateRole
Your IAM user is missing iam:CreateRole, iam:AttachRolePolicy, or iam:PassRole. Attach IAMFullAccess or add these actions to your policy.
BucketAlreadyExists / BucketAlreadyOwnedByYou
The S3 bucket name is already taken globally. Open the S3 node in CSC, change the Bucket Name, and enable the unique suffix checkbox before re-exporting.
AlreadyExistsException — stack already exists
A stack with this name already exists. Either delete it first (aws cloudformation delete-stack) or use a different stack name.
Invalid parameter: Endpoint Reason: Cannot create a subscription to an email address
The email address in the SNS subscription is invalid. Correct it in the SNS node property panel and re-export.
ResourceNotFoundException or ThrottlingException mid-deploy
Usually a transient AWS API issue. Wait 2–3 minutes and redeploy. If it persists, check the AWS Service Health Dashboard.
Stack is in ROLLBACK_COMPLETE state and cannot be updated
Delete the failed stack first, then redeploy: aws cloudformation delete-stack --stack-name YOUR-STACK-NAME
Export name already exists in another stack
A CloudFormation Output with this name is already exported by another stack. Rename the export or use a different stack name.
Step 2 — Delete a failed stack before redeploying
# Console: CloudFormation → select stack → Delete
# CLI:
aws cloudformation delete-stack \
--stack-name YOUR-STACK-NAME \
--region us-east-1
# Wait for deletion:
aws cloudformation wait stack-delete-complete \
--stack-name YOUR-STACK-NAME \
--region us-east-1
aws s3 rm s3://YOUR-BUCKET --recursiveStep 3 — Fix the issue in CloudStack Canvas
Most failures come from one of: a missing required property, a name collision, or a missing IAM permission. Fix the root cause in the CSC property panel, re-export the template, then redeploy. Do not try to deploy the same template twice without fixing the issue — CloudFormation will reject it.
CloudFormation Console walkthrough (for all templates)
- 1
Open CloudFormation in the AWS Console
Navigate to CloudFormation using the search bar. Make sure your region (top-right) matches where you want to deploy — most CSC templates use us-east-1.
- 2
Create stack
Click "Create stack" → "With new resources (standard)". Under "Specify template", choose "Upload a template file". Click "Choose file" and select the JSON or YAML file exported from CloudStack Canvas.
- 3
Name the stack
Enter a stack name (e.g. csc-static-site). Names must be unique per region. Click Next.
- 4
Fill in parameters
If the template has parameters (visible in the Parameters section of the export modal), fill them in here. Leave environment as "dev" unless you are deploying to staging or production.
- 5
Configure stack options
Leave defaults. Optionally add tags. Click Next.
- 6
Review and acknowledge IAM
At the bottom of the review page, check the box: "I acknowledge that AWS CloudFormation might create IAM resources with custom names." Click Submit.
- 7
Monitor the Events tab
Watch the Events tab as resources are created. Green = success, red = failure. If any resource fails, read the Status reason — this is your error message.
- 8
Check Outputs after completion
When the stack status changes to CREATE_COMPLETE (shown in green), click the Outputs tab. This is a list of key information about your deployed resources — URLs, connection strings, resource names — that CloudFormation surfaces so you don't have to go hunting. You will need these values to configure your application.
Creating an Organization
TeamOrganizations let Team plan users share projects under a single workspace. All members of an organization can see and open org projects from their dashboard.
- 1
Open Settings → Organization
Navigate to Settings and select the Organization tab, or follow the Set up Org prompt on your dashboard if you're on a Team plan with no organization yet.
- 2
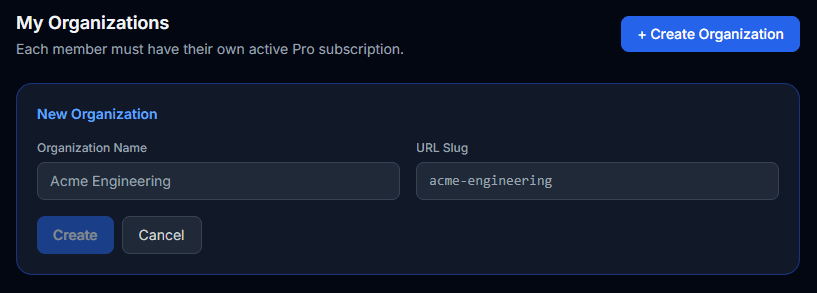
Create an Organization
Click Create Organization. Enter a unique name — this becomes your org's display name and slug used in the system.
- 3
Invite Members
Once created, use the Invite member field under your org to add teammates by email. Invited users must already have a CloudStack Canvas account. They will receive a pending invite on their dashboard that they can accept or decline, which includes an expiration date.
- 4
Share Projects
Create new projects inside the org from your dashboard (the + New Org Project card), or move an existing personal project into the org using the Move to Org button (double-arrow icon) on any personal project card.
Roles & Permissions
TeamEvery org member has one of four roles. Roles are ranked — higher ranks can only be assigned by someone of equal or higher rank.
| Role | View Projects | Edit Projects | Create Projects | Manage Members | Delete Org |
|---|---|---|---|---|---|
| Owner | ✓ | ✓ | ✓ | ✓ | ✓ |
| Admin | ✓ | ✓ | ✓ | ✓ (up to admin) | — |
| Editor | ✓ | ✓ | ✓ | — | — |
| Viewer | ✓ | — | — | — | — |
An Owner cannot leave an organization unless they first transfer ownership or delete the org. Admins can invite members, change roles below their own rank, and remove editors/viewers.
Org Projects
TeamOrg projects are visible to all members of the organization regardless of who created them.
- Create — click + New Org Project on the dashboard (editors and above).
- Move — transfer a personal project into an org via the double-arrow icon on any personal project card.
- Open — any org member can open and view an org project.
- Edit — editors, admins, and owners can make and save changes.
- Delete — owners and admins can delete org projects from the dashboard (the trash icon appears for eligible roles only).
Real-time Collaboration
Team
Team plan users have real-time collaboration on saved projects (not the unsaved editor at /canvas/editor). Multiple team members can work on the same project simultaneously.
Collaboration uses a Server-Sent Events (SSE) stream from the server to each connected client, plus lightweight REST calls from clients to the server. No WebSocket server is required.
What syncs in real time
- Cursor positions (throttled to 20 updates/second per user)
- Node selection (which node each user has clicked)
- Node moves (when a user finishes dragging a node)
What does not sync automatically
- Adding or removing resources — these appear after the next auto-save cycle
- Property changes — same, reflected after auto-save
Cursor Presence
TeamWhen collaborators are on the same canvas, their cursors appear as colored SVG pointers with their name. Each user gets a unique color assigned automatically.
Selected nodes show a colored ring matching the collaborator's color, so you can see what each person is working on at a glance.
Cost Estimation Overview
ProThe cost estimation engine computes a projected monthly AWS bill for the resources on your canvas based on AWS public pricing. Estimates are updated each time you open the cost panel or add/remove resources.
Costs use the following default assumptions:
- Region: us-east-1 (prices vary by region)
- On-Demand pricing (no Reserved or Savings Plan discounts)
- 730 hours / month for compute resources
- Data transfer within the same region is free
- Coverage: the estimator covers common services (EC2, RDS, Lambda, S3, CloudFront, DynamoDB, and more), but some services are not yet priced
Reading the Cost Panel
ProClick the floating Est. cost pill at the bottom-right of the canvas to expand the cost panel in place.
Panel layout
- Total monthly estimate — sum of all nodes in large text at the top
- Per-resource breakdown — each node with its estimated monthly cost and a line-item breakdown (compute, storage, etc.)
- Pricing data source — the month (e.g. us-east-1 list prices updated July 2026) shown in the footer; rates refresh monthly from the AWS Price List API
Resources with no pricing data (IAM Roles, Security Groups, VPCs) show $0.00 since they have no direct cost. Some services are also not yet priced in the estimator (SSM Parameter, Step Functions, EFS, Redshift, and a few others) and show $0.
AWS Billing Alarms
ProThe Billing Alarm template (Pro and Team plans) deploys four CloudWatch alarms that notify you when your AWS spend crosses configurable thresholds — protecting you from unexpected charges.
What gets deployed
| Alarm | Default threshold | What it monitors |
|---|---|---|
| $10 Warning | $10 | Month-to-date spend ≥ threshold |
| $50 Alert | $50 | Month-to-date spend ≥ threshold |
| $100 Critical | $100 | Month-to-date spend ≥ threshold |
| Daily Spend | $5/day | Single day's spend ≥ threshold (catches spikes) |
All thresholds are editable in the property panel before you export. Click any alarm node and change the Alarm Threshold field.
Before you deploy
- Enable billing alerts in your AWS account — go to Billing → Billing Preferences → Receive Billing Alerts and save. Without this, CloudWatch never receives billing data and all alarms stay in
INSUFFICIENT_DATA. - Deploy in us-east-1 — AWS billing metrics are only published to us-east-1 regardless of where your other resources live.
- Enter a notification email on the SNS node in the property panel before exporting. CloudFormation creates the subscription automatically and AWS sends a confirmation link to that address.
Email subscription
Select the Billing Alerts SNS node on the canvas and enter your email in the Notification Email field. When you deploy the exported template, CloudFormation creates an AWS::SNS::Subscription resource that triggers AWS to send a confirmation email. Check your inbox — the email comes from no-reply@sns.amazonaws.com with subject "AWS Notification - Subscription Confirmation".
How the Daily Spend alarm works
AWS publishes your total month-to-date spend to CloudWatch once every 24 hours. By itself that number grows throughout the month, so a simple threshold alarm would fire every day once your monthly total crosses it — not useful.
The Daily Spend alarm solves this by calculating how much your bill grew since yesterday. For example: if your month-to-date total was $12 yesterday and is $19 today, the daily spend is $7. If your threshold is $5, the alarm fires. If the bill grew by only $3 today, the alarm stays quiet. This catches sudden spikes — like a runaway process or an accidental large resource — that the monthly alarms would not catch until later in the month.
INSUFFICIENT_DATA until the first daily metric arrives — this is normal and can take up to 24 hours after deploying.Free Plan
The Free plan is permanent — no credit card required, no trial expiry.
| Limit | Free | Pro | Team |
|---|---|---|---|
| Projects | 2 | Unlimited | Unlimited |
| Nodes per canvas | 30 | 200 | 500 |
| Exports / month | 25 | Unlimited | Unlimited |
| Export formats | CFN JSON + YAML | CFN JSON + YAML | CFN JSON + YAML |
| Cost estimation | No | Yes | Yes |
| Collaboration | No | No | Yes |
| Team members | 0 | 0 | 10 |
| Pro AWS services | No | Yes | Yes |
Pro Plan
Pro unlocks the full canvas experience for individual developers. Billed monthly or annually ($32.50/mo billed annually = 2 months free).
- Unlimited projects, 200 nodes per canvas
- Unlimited CloudFormation JSON & YAML exports
- Cost estimation panel
- All AWS services in the palette
- Bidirectional IaC sync
Team Plan
Team plan removes all limits and adds real-time collaboration for your entire team at a flat price.
- Unlimited projects and nodes (500 per canvas)
- Up to 10 team members — members join free, only the workspace owner pays
- Up to 5 concurrent editors per project
- Unlimited exports (CloudFormation JSON & YAML)
- Cost estimation & bidirectional IaC sync
- Priority support & onboarding